Suppose you want to keep something (e.g. a room, sous-vide steak, autoclave) at a certain temperature with, say, an immersion water heater; you could use an off-the shelf temperature controller, OR save some money (but not time), and build your own from the ground up. If, like me, you’re cash poor, time rich, and intellectually curious, you may consider building one yourself. I’d say this isn’t a quick build, but I think it is pretty straight-forward.
Bill of Materials:
- numeric display (x2)
- potentiometer
- thermistor or thermocouple
- 10 K resistor
- Arduino
- microSD shield (if you want to log data)
- AC power control, digital pot/relay, etc…
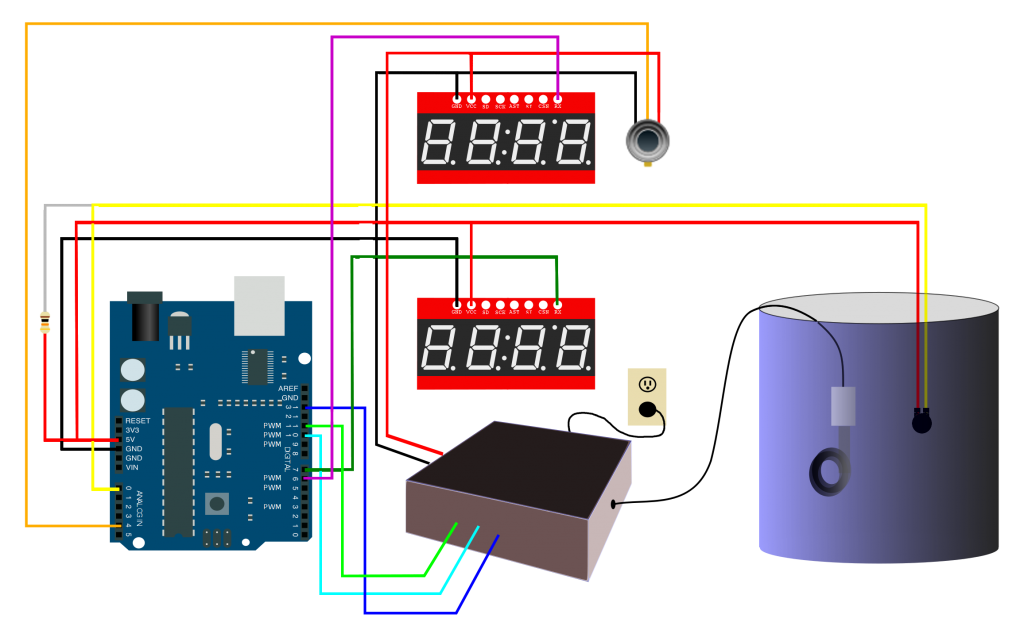
Let me try to break this down into three parts. You need something to measure temperature with, something to control temperature with, and some UI to view/control the temperature.
To read the temperature, I went with a thermistor, but a thermocouple would do just as well (sort of depends on the temperature range of your application); it’s just not as easy to get up and running.
For the display, I have found these Sparkfun displays are the best balance of relatively low cost and saving me a lot of pins, wiring, coding, etc. headaches.
Obligatory Disclaimer: AC POWER CAN KILL YOU
For Pete’s sake, be careful, and never handle any circuitry without unplugging everything first. Use a GFCI outlet; if something goes awry, it will minimize the current going where it isn’t supposed to before cutting off power.
As far as controlling AC power goes, you have a few options, depending on your application and comfort level. No matter what you choose, I highly recommend making sure the Arduino connections are optically isolated, and the dangerous bits (anything with high voltage) are safely inside a separate, insulated box. I’d say the easiest way to introduce AC power into your project would be to use a relay of some sort; this gives you limited on/off control, and it is relatively straightforward. I wanted to be able to control the power level, so my circuit is a little more complicated, turning the AC current on and off every cycle to dial in exactly how much current/power gets delivered.
Okay, so Bildr already has a pretty good page (if I do say so myself) about how to use a thermistor to read temperature; it only takes one analog input (plus power and ground), as well as a resistor. So that’s easy as pie to setup.
Furthermore, there’s also an article on setting up and using the Sparkfun 4-digit serial display. I think it’s pretty easy to set up with SPI communication; it minimizes the pins you have to use for one or two displays, and using the NewSoftSerial library for Arduino, you can use any digital pin you want to send SPI communications. Of course, we don’t care what the board has to say back to us, so you really only need to hook up the transmission (TX) pin to the display’s RX pin.
That only leaves AC power control as the real beast. I’ll save the gory details for getting under the hood of AC power control for a future post. For the purposes of this, I literally put a black box into the schematic.
So how to tell the Arduino what temperature to shoot for? I wired up a potentiometer for each heater I had. One serial display displayed the current temperature; the other displays a number I control by turning the potentiometer. At first, I tried simply controlling the “target” temperature, utilizing the Arduino PID library to do the dirty work calculating the power that should be delivered to the heater to reach and maintain the target temperature.

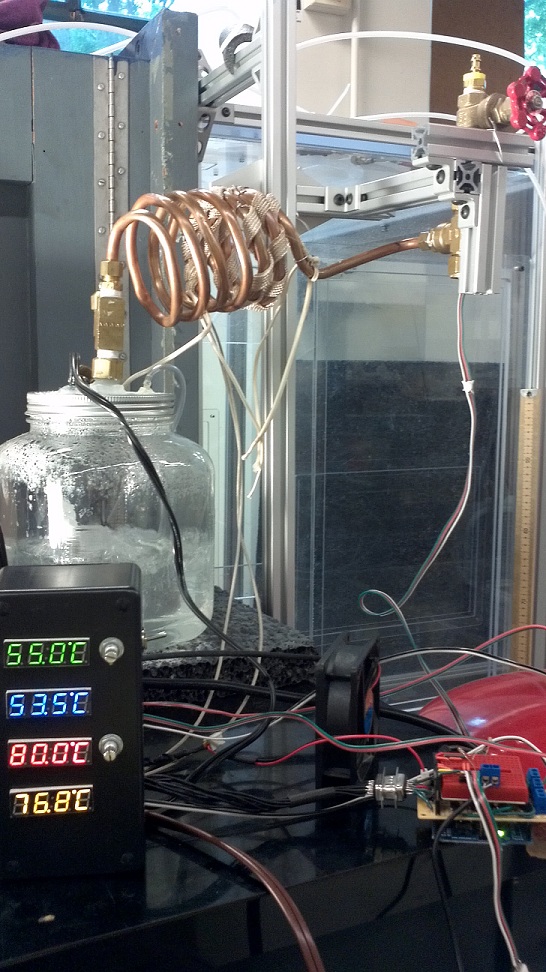
Experimental setup of two of the temperature controllers (all displays are of temperature b/c I was still trying PID control)
I don’t think it was a problem with the library, but more with my setup and lacking of proper “tuning” of the parameters, but this type of control didn’t work for me. So I ended up using the potentiometers to just control the power delivered to my heaters (basically, turning my elegant Arduino AC control into a dimmer). Then the second displays were just used to output the percent power of AC being delivered.
The last little bit of complexity I added (not shown) was to do some data recording using Sparkfun’s microSD shield (note, it doesn’t come with header pins). To get it up and running, make use of their Quickstart Guide; it involves downloading a new library and learning a few new commands, but it’s a great shield to mix into your Arduino rotation.
By the time I got everything wired up (and when I use it, I actually double the number of thermistors and heaters, as well as measure the relative humidity), I use nearly all of the Arduino I/O pins. But I guess that what an Arduino MEGA or 4051 is for. One thing I did to maximize output while minimizing hardware was to add a flip switch that I would monitor and let it dictate what is output on my serial displays instead of just adding more displays (e.g. an open switch means I’ll output relative humidity; a closed switch, and I’ll send temperature as an output).


Any chance that you would post your Arduino code for this or email it? It looks quite similar to what I am trying with a home brewery.
What are you using the system for?
Thanks.
I’ll shoot you an email with an overly complicated pde code I used. In the meantime, check out bildr.org as a good resource. In fact, this was written up on the blog:
http://bildr.org/2011/08/user-project-high-voltage-temperature-control/
I’m using it for a lab experiment. We need hot, humid air, but I want to produce it consistently…
Any chance that you would post your Arduino code for this or email it?
my goal is to switch off compressor when the maximum temp reached.
Hi, i do own 2 220v temp modules i want to recycle “plastic” for my 3d printer so i would be verry intereested on your tempcontrol ,..
how you control the amperes to the heat elements because so far i thought i simply do it by relais ,.. as i successfully do with my compressor at the cnc mill but thats another story ,.. thx
tk
Hello,
I would like to ask if this temperature controller are suitable for DIY plastic injection molding?